 Save to Pinterest
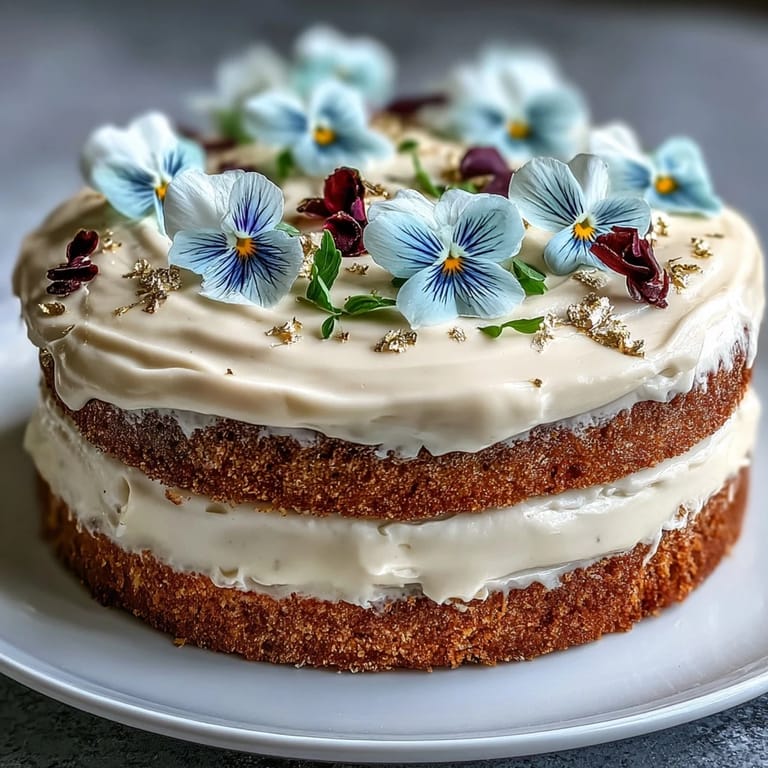
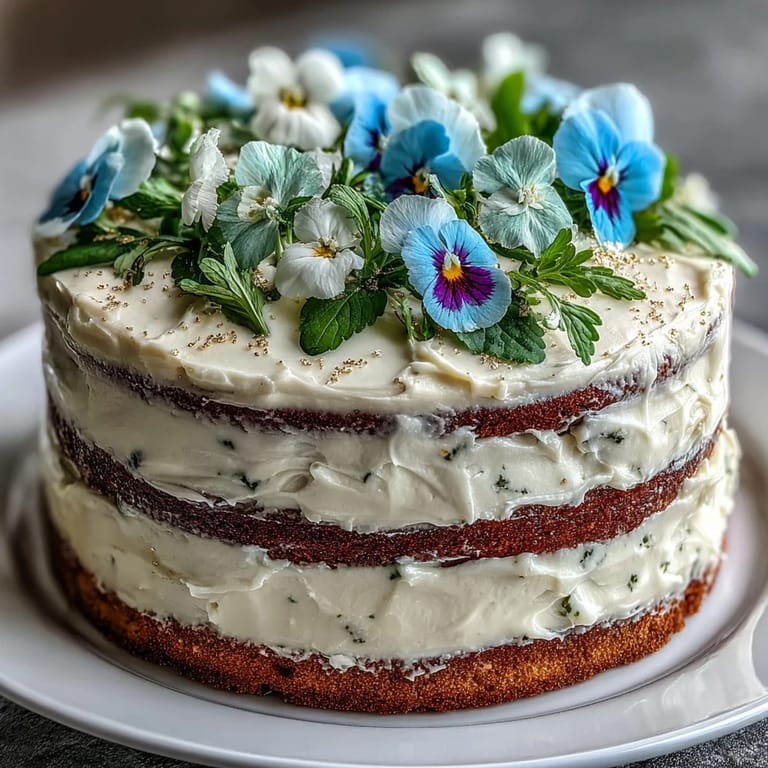
 My cousin called me three weeks before her graduation, voice trembling with that mix of excitement and panic only a milestone moment can bring. She asked if I could bake her something that felt as significant as the day itself—not just delicious, but beautiful enough to announce what she'd accomplished. That conversation led me to this cake, where vanilla sponge meets Swiss meringue buttercream and edible flowers whisper elegance. The first time I pressed gold leaf onto the frosting, my hands shook slightly, worried I'd smudge it, but something clicked when I saw how the light caught those shimmering petals. Now whenever I make it, I think about how dessert can be more than sustenance—it can be a celebration wrapped in butter and sugar.
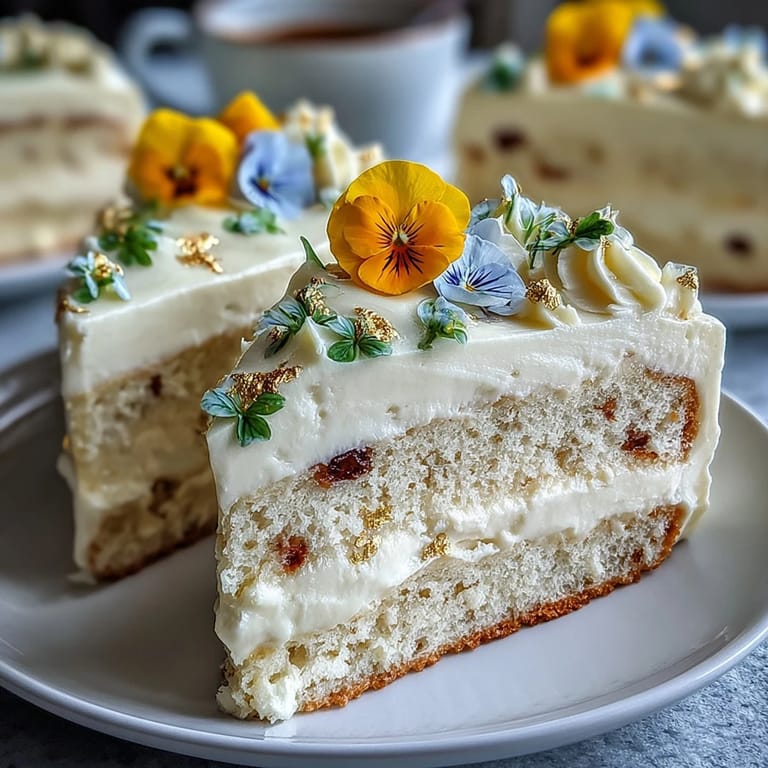
I'll never forget watching my cousin's face when she saw the cake emerge from its box at her graduation party. The afternoon sun hit the gold leaf just right, and someone gasped—an actual gasp—before everyone laughed. She said it was almost too pretty to eat, which of course she didn't mean, and within minutes the knife was cutting through those tender vanilla layers. Her friends wanted the recipe, her mother wanted to know how long it took, and I realized that sometimes the most meaningful recipes are the ones that do double duty as both memory and meal.
Ingredients
- All-purpose flour (2 1/2 cups): The foundation of a tender crumb—sift it with the baking powder to avoid dense pockets that can ruin the delicate structure.
- Baking powder (2 1/2 tsp): Don't skip the double-check that yours is fresh, because stale leavening will betray you halfway through baking.
- Salt (1/2 tsp): This tiny amount amplifies the vanilla and keeps the sweetness from becoming cloying.
- Unsalted butter (1 cup plus 1 1/2 cups for buttercream): Room temperature is non-negotiable here—cold butter won't incorporate air, and your cake will suffer for it.
- Granulated sugar (2 cups plus 1 1/4 cups for buttercream): The sugar in the sponge creams with butter to trap air; in the meringue, it dissolves completely to create that glossy, stable frosting.
- Eggs (4 large plus 5 egg whites): Room temperature eggs emulsify smoothly into the batter, and egg whites for the meringue must be absolutely free of yolk or they won't whip to peaks.
- Vanilla extract (1 tbsp plus 2 tsp): Use pure vanilla, not imitation—the difference becomes obvious when the cake is this simple and unmasked.
- Whole milk (1 cup): Alternating wet and dry ingredients keeps the batter from becoming tough; the milk adds moisture that plain water cannot.
- Edible flowers (pansies, violets, roses): Source these from a reputable grower who guarantees pesticide-free flowers—supermarket flowers are treated with chemicals never meant for eating.
- Edible gold leaf sheets: A small investment that transforms the cake; one sheet goes surprisingly far when applied with a light touch.
Tired of Takeout? 🥡
Get 10 meals you can make faster than delivery arrives. Seriously.
One email. No spam. Unsubscribe anytime.
Instructions
- Set your stage:
- Preheat the oven to 350°F and grease three 8-inch cake pans, then line them with parchment paper so your finished cakes slide out without sticking. This step feels tedious until you're standing there at midnight, relieved you prepped ahead.
- Build the dry base:
- Whisk flour, baking powder, and salt together in a bowl and set it aside. This combines the leavening evenly throughout, preventing bitter pockets of baking powder in some bites and none in others.
- Cream butter and sugar:
- Beat room-temperature butter with sugar until it's light, fluffy, and pale—usually about 3 minutes with an electric mixer. You're incorporating air here, which is what makes the cake tender and delicate.
- Add eggs one at a time:
- After each egg, beat well before adding the next; this emulsification is what keeps everything cohesive and prevents the batter from separating into a greasy puddle. Then mix in the vanilla extract.
- Alternate wet and dry:
- Add flour mixture and milk in alternating batches, starting and ending with flour, mixing just until combined each time. Overmixing at this stage develops gluten and toughens your cake—restraint is the secret.
- Divide and smooth:
- Pour batter evenly into the three prepared pans and smooth the tops so they bake evenly. An offset spatula glides across the surface without much pressure.
- Bake until golden:
- Bake for 28 to 32 minutes, watching for a pale golden color and the toothpick test—inserted in the center, it should come out clean or with just a crumb or two. Every oven is different, so start checking at 27 minutes to avoid overbaking.
- Cool with patience:
- Let the cakes cool in their pans for 10 minutes—this sets the structure without shocking them with cold air—then turn them out onto wire racks to cool completely. Rushing this step leads to broken layers and frustration.
- Make the meringue base:
- Combine egg whites and sugar in a heatproof bowl set over simmering water and whisk constantly until the sugar dissolves completely and the mixture reaches 160°F. This pasteurizes the eggs and dissolves the sugar so it incorporates smoothly into the butter later.
- Whip to peaks:
- Transfer the warm mixture to a stand mixer and beat on high speed until stiff peaks form and the bowl cools completely—around 8 to 10 minutes. The meringue should look glossy and cloud-like, not grainy.
- Add butter gradually:
- Reduce the mixer speed to medium and add butter a few cubes at a time, waiting for each addition to incorporate smoothly before adding more. If the buttercream looks separated or greasy, stop and let it cool slightly before continuing—it will come together.
- Final touches on frosting:
- Mix in vanilla extract and a pinch of salt, which heightens all the flavors without making the frosting taste salty.
- Assemble the cake:
- Place the first cake layer on your serving plate and spread it with buttercream, then repeat with the second layer and frosting, topping with the third layer. Once stacked, apply a thin crumb coat—a light layer that traps loose crumbs—then chill for 20 minutes so you can apply a smooth final layer without visible imperfections.
- Apply the final frosting:
- Use an offset spatula to apply a second, thicker layer of buttercream, smoothing it as much or as little as your vision allows. Some people love a perfectly smooth finish; others prefer a slightly textured, more rustic look.
- Add gold leaf with intention:
- Using a clean, dry food-safe paintbrush, gently press edible gold leaf onto sections of the frosted cake—along the top edge, in a stripe down the side, or scattered asymmetrically. The brush helps you position it without fingerprints, and the gold catches light beautifully against white frosting.
- Crown with flowers:
- Arrange your edible flowers decoratively over the cake, placing them where they'll be stable and visible. A ribbon wrapped around the base is optional but adds a final touch of elegance.
 Save to Pinterest
 There was a moment, standing in my cousin's kitchen the night before her graduation, when I piped the last swirl of buttercream and stepped back to look at what we'd made together. She'd insisted on helping with the decoration, and watching her carefully place the first pansy onto the frosting—that small deliberation, the tiny smile when it stayed exactly where she positioned it—that felt like the real celebration. The cake was beautiful, yes, but it became unforgettable because we made it with our hands, laughed when the gold leaf stuck to the paintbrush instead of the frosting, and in that kitchen, marked something worth marking.
The Swiss Meringue Difference
The first time I made American buttercream with just butter and powdered sugar, it tasted fine but felt grainy and broke apart when I tried to pipe. Swiss meringue buttercream changed everything—by heating the eggs and sugar first, you create a meringue that's already stable before the butter goes in, resulting in frosting that's silkier, more forgiving, and genuinely delicious instead of just sweet. It also holds its shape better in warm kitchens and doesn't need to be refrigerated quite so aggressively, which makes decorating less of a race against time.
Sourcing Edible Flowers Safely
The first time someone asked me where to buy edible flowers, I almost recommended a standard florist, then caught myself—those flowers are treated with pesticides and fungicides that are fine for looking at but absolutely not for eating. What I learned through research and mistakes is that edible flowers must come from a source that explicitly guarantees they're grown without chemical treatments. Local farmers markets often have vendors who specialize in edible flowers; online retailers deliver them in season; some nurseries sell them specifically for culinary use. When you receive them, store them in a sealed container in the refrigerator, and use them within a few days for best flavor and appearance.
Variations and Personal Touches
I've made this cake vanilla, and I've made it chocolate by replacing half a cup of flour with cocoa powder, and both versions shine with the same elegant decoration. Some bakers swap a cup of the milk for buttermilk to add tang; others infuse the frosting with a tiny bit of lavender or lemon zest to make it taste as special as it looks. Once you trust the structure, you can play with flavor while keeping the same celebration-worthy presentation.
- For a chocolate version, replace 1/2 cup of the all-purpose flour with unsweetened cocoa powder to maintain structure while adding deep chocolate flavor.
- A few drops of almond extract mixed into the buttercream alongside vanilla creates an unexpected complexity that pairs beautifully with floral decorations.
- If you're decorating ahead of time, keep the finished cake in a cool room rather than the refrigerator—cold frosting can crack slightly when exposed to warm air, and condensation will wilt the flowers.
 Save to Pinterest
 This cake has become my go-to for anyone celebrating something worth celebrating, because it's beautiful enough for a photograph but approachable enough that a home baker can pull it off. Every time someone cuts into it and discovers those tender vanilla layers beneath the gold and flowers, I see that same look on their face—surprise, delight, and the knowledge that someone cared enough to make something special.
Questions & Answers About This Recipe
- → What type of flowers can I use for decoration?
Use only edible flowers that are pesticide-free and safe for consumption, such as pansies, violets, or roses.
- → How is the buttercream prepared?
The buttercream is made by heating egg whites and sugar over simmering water, then whipping until stiff peaks form before incorporating butter and flavorings.
- → Can I substitute any ingredients?
A chocolate version can be made by replacing half a cup of flour with cocoa powder for added richness.
- → How do I apply the gold leaf?
Use a food-safe paintbrush to gently apply edible gold leaf sheets onto the chilled cake surface.
- → What tools are essential for making this cake?
Essential tools include 8-inch round cake pans, an electric mixer, mixing bowls, an offset spatula, and a food-safe paintbrush.