 Save to Pinterest
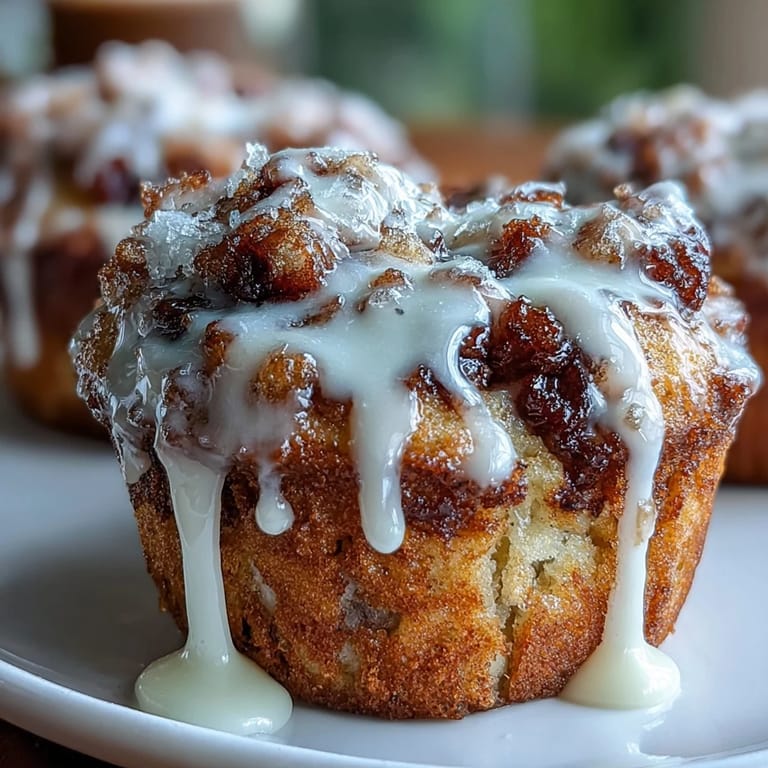
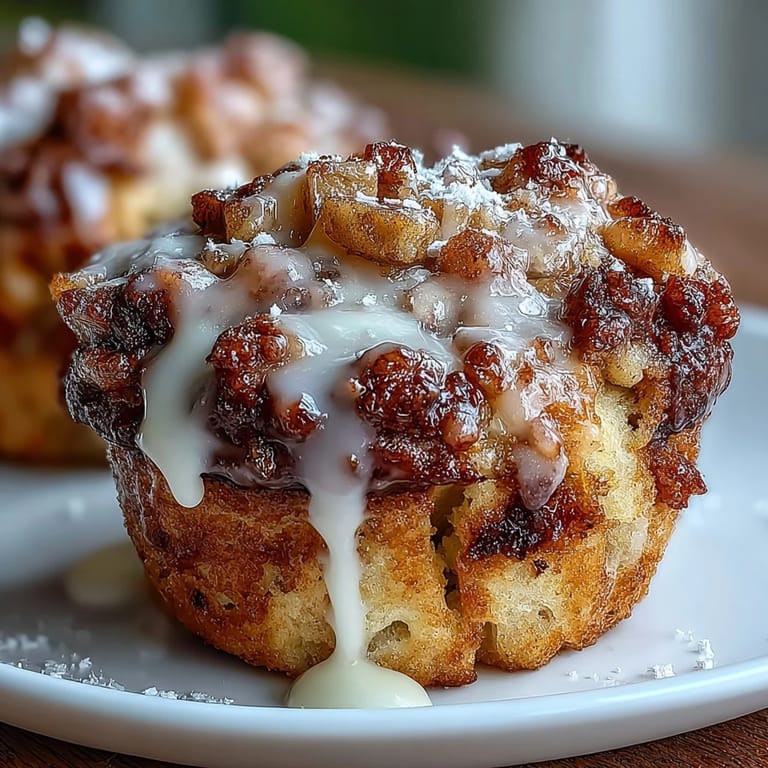
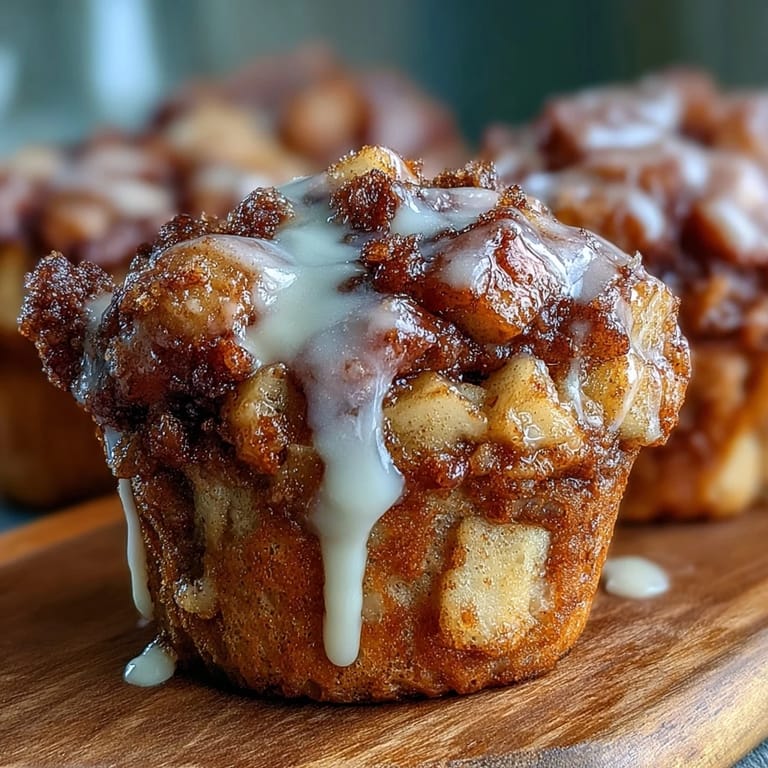
 My mom used to make apple fritters at the fair every autumn, the kind that came out of the oil all golden and puffy, dusted thick with powdered sugar. Years later, I was craving that exact taste on a random Tuesday morning but didn't want the mess of deep frying in my small kitchen. So I started experimenting with muffin tins instead, and after a few attempts—one where I somehow overmixed the batter and ended up with hockey pucks—I finally nailed it. These Apple Fritter Muffins taste like that carnival memory, but they're tender, moist, and ready in under an hour without the oil splatters.
I made these for my neighbor last spring when she was recovering from surgery, and I remember how her face lit up when she opened the container. She called me the next day to say she'd eaten two while they were still warm, and her teenage son had demolished the rest. That's when I knew this recipe was the real deal—not because they're technically perfect, but because they actually made someone's day a little better.
Ingredients
- Apples (2 large, peeled, cored, and diced): Granny Smith gives you that slight tartness that cuts through the sweetness, but Honeycrisp works beautifully if you like them softer and juicier. Dice them into chunks about the size of a pea so they distribute evenly and don't sink to the bottom.
- All-purpose flour (2 cups): This is your structure, so measure it right by spooning it into the cup and leveling off rather than scooping straight from the bag.
- Brown sugar (3/4 cup, packed): Pack it down gently in the measuring cup so you get the full sweetness and moisture these muffins need.
- Baking powder (2 teaspoons): This is what makes them rise and stay tender, so check the expiration date on your tin—old baking powder won't do the job.
- Ground cinnamon (1 1/2 teaspoons): This is the flavor backbone, and using fresh cinnamon from a container you've had less than six months makes a noticeable difference.
- Salt (1/2 teaspoon): Never skip this; it brings out all the other flavors and balances the sweetness.
- Eggs (2 large): Room temperature eggs mix more smoothly into the batter and create a more cohesive crumb.
- Milk (1/2 cup plus 1-2 tablespoons for glaze): Any milk works here, but whole milk gives a richer muffin than skim.
- Unsalted butter (1/4 cup, melted): Melt it and let it cool just slightly so it doesn't scramble the eggs when you combine them.
- Vanilla extract (1 teaspoon): A splash of real vanilla makes these taste homemade in the best way, not from a box.
- Powdered sugar (2 tablespoons): The glaze is optional but transforms these from muffins into something that feels like a treat.
Tired of Takeout? 🥡
Get 10 meals you can make faster than delivery arrives. Seriously.
One email. No spam. Unsubscribe anytime.
Instructions
- Heat your oven and prepare:
- Preheat to 350°F and grease a 12-cup muffin tin or line it with paper liners so they slip out cleanly later. This step takes two minutes but saves you from disaster.
- Mix the dry blend:
- Whisk flour, brown sugar, baking powder, cinnamon, and salt in a large bowl until everything looks evenly combined and there are no brown sugar lumps hiding in the corners. You want the cinnamon distributed so every muffin tastes the same.
- Combine the wet ingredients:
- In a separate bowl, whisk eggs, milk, melted butter, and vanilla until they're one cohesive mixture. This step is where you're building the structure that'll hold those apple chunks.
- Bring it together gently:
- Pour the wet into the dry and fold with a rubber spatula until just barely combined—you want to see some streaks of flour still visible. This is the hardest part to resist rushing, but overmixing makes the muffins tough and dense, which is the opposite of what you want.
- Add the apples:
- Fold in the diced apples until they're scattered throughout the batter evenly. If you stir too much here, you'll break them down and lose the texture.
- Fill the muffin cups:
- Divide the batter evenly so each cup is about 2/3 full, leaving room for them to rise without overflowing. A small cookie scoop makes this job less messy.
- Bake until golden:
- Bake for 20–25 minutes, checking with a toothpick inserted into the center of a muffin—if it comes out clean with maybe one tiny crumb, you're done. The tops should be golden brown but not dark.
- Cool with patience:
- Let them sit in the pan for 5 minutes so they firm up, then transfer to a wire rack. Cooling them completely before glazing prevents the glaze from melting and running off.
- Make and drizzle the glaze:
- Whisk powdered sugar with 1 tablespoon of milk, then add more milk a few drops at a time until you get a pourable but not-too-thin consistency. Drizzle it over the cooled muffins in a thin zigzag, and let it set for a few minutes before eating.
 Save to Pinterest
 There's something almost meditative about folding those apple chunks into batter on a quiet morning, watching the white batter flecked with brown sugar and cinnamon suddenly come alive. It's the moment before they become muffins, when they're still just potential in a bowl, and then an hour later your kitchen smells like an apple orchard had a party with vanilla and butter.
Why the Texture Matters
The secret to these muffins being tender instead of cakey is respecting the fold—literally. When you combine wet and dry, you're trying not to activate the gluten too much, which would make them tough. Think of it like you're tucking the ingredients together gently instead of stirring aggressively. I learned this the hard way after my first batch turned out dense enough to use as a doorstop.
Apple Choices and Seasonality
Granny Smith apples are my go-to because they hold their shape and add a subtle tartness that balances the brown sugar, but I've used Honeycrisp in winter when Granny Smiths taste mealy, and they're wonderful—just juicier and sweeter. The key is picking apples that feel firm when you squeeze them gently, not ones that feel soft or have wrinkled skin. If you're making these in fall, grab whatever's at the farmers market that day and taste it first—that's how you'll know if it's the right apple.
Storage, Freezing, and Flavor Variations
I keep baked muffins in an airtight container at room temperature and they stay fresh for three days, though they never last that long in my house. Freezing them works beautifully—wrap them individually in foil, toss them in a freezer bag, and they're good for a month. Thaw them at room temperature and re-glaze them after they've warmed up so the glaze looks fresh and glossy.
- A pinch of nutmeg adds warmth and complexity, especially if you're making these in cooler months.
- Toasted walnuts or pecans stirred in with the apples add a buttery crunch that feels fancy but requires zero extra skill.
- Using cream instead of milk in the glaze makes it richer and gives it a slight tang that's absolutely delicious.
 Save to Pinterest
 These muffins feel like home in the form of something you can grab and eat with your hands. Make them once and they'll become part of your regular rotation, the way comfort foods do.
Questions & Answers About This Recipe
- → What type of apples work best?
Granny Smith or Honeycrisp apples are preferred for their tartness and firm texture, which hold up well during baking.
- → Can I add nuts to the batter?
Yes, folded in chopped toasted walnuts or pecans add a nice crunch and flavor contrast.
- → How should I store these muffins?
Keep in an airtight container at room temperature for up to three days to maintain freshness.
- → Is there a way to enhance the glaze?
Using cream instead of milk in the glaze mixture creates a richer, silkier topping.
- → Can these muffins be frozen?
Yes, freeze baked muffins and thaw at room temperature before adding the glaze for best results.